qcuenv@gmail.com
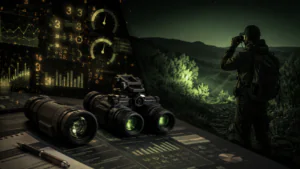
What Is a PVS-31 Night Vision Goggle?
A PVS-31 is a type of binocular night vision goggle. “Binocular” means it has two optical channels, one for each eye. Compared with a monocular night vision device, binocular night vision goggles usually feel more natural for longer observation because both eyes are involved.
Most PVS-31-style devices are based on image intensifier technology. Inside each optical channel, an image intensifier tube collects very low levels of ambient light, such as moonlight or starlight, and amplifies it into a visible image. This is different from digital night vision, which uses a camera sensor and display screen.
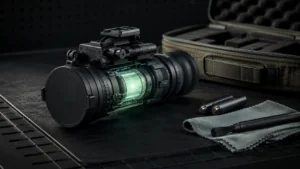
A typical PVS-31 night vision goggle includes several basic parts:
| Part | Basic Function |
|---|---|
| Objective lens | Collects light from the environment and focuses the image |
| Eyepiece | Allows the user to view the intensified image |
| Image intensifier tube | Amplifies low-level light into a visible image |
| Battery compartment | Holds the power source |
| Power control | Turns the device on and off |
| IR illuminator | Provides auxiliary infrared light on some models |
| Diopter adjustment | Adjusts the eyepiece for the user’s eyesight |
| Helmet mount interface | Connects the device to a helmet mount or head mount |
| Articulating pods | Allow one or both optical pods to be flipped up on some models |
Not every PVS-31 version has the same layout or functions. Some models may include manual gain control, built-in IR, auto shutoff when flipped up, or different battery systems. Because of this, a beginner should first learn the position and function of each control before using the device in the dark.
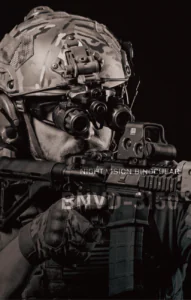
How to Wear PVS-31 Correctly
A PVS-31 night vision device is usually worn with a helmet mount or head harness. Correct wearing is important because even a clear image can feel uncomfortable if the device is not aligned with your eyes.
Start by checking the helmet mount. Make sure the mount is fixed firmly and does not shake. Attach the night vision goggles to the mount according to the device interface. After locking the device in place, gently check whether it is secure before turning it on.
Next, adjust the position of the goggles in front of your eyes. The eyepieces should be close enough for a full image, but they should not press against your face. If the device is too far away, the image may look narrow or incomplete. If it is too close, it can cause discomfort and make movement harder.
Eye relief is the distance between your eyes and the eyepieces. A beginner should spend time adjusting this distance. The correct position is where both eyes can see a clean, centered image without forcing the face forward.
Then adjust the interpupillary distance, which means the distance between the left and right optical channels. Your eyes should naturally line up with both eyepieces. If one side looks dark, off-center, or uncomfortable, the two pods may not be aligned with your eye spacing.
A good wearing setup should feel stable, balanced, and natural. If the helmet feels too front-heavy, a counterweight or battery pack may help, depending on the setup. Do not start walking or observing in a complex outdoor area until the device feels secure and properly aligned.
How to Focus PVS-31
Focusing is one of the most important steps for new users. Many beginners think the device is defective when the image looks blurry. In many cases, the issue is simply incorrect focus.
There are two main adjustments to understand: diopter adjustment and objective focus.
The diopter adjustment is usually located near the eyepiece. It adjusts the image to match your eyesight. The objective focus is usually adjusted at the front lens. It controls the focus distance for objects in the environment.
A simple focusing process is:
- Put on the device and align it with your eyes.
- Turn on the night vision goggles in a safe low-light environment.
- Adjust the diopter for each eye until the image or screen texture looks sharp.
- Look at a target at a practical distance.
- Adjust the objective focus until the target becomes clear.
- Repeat lightly for the other side if needed.
It is usually better to set the diopter adjustment first. Once the diopter is adjusted for your eyes, you do not need to change it often. The objective focus may be adjusted more frequently because different targets are at different distances.
For example, if you are looking at a nearby object, you may need to rotate the objective lens toward a close-focus position. If you are looking across an open outdoor area, you may need to adjust toward a farther focus position. For movement, many users prefer setting the objective focus to a general middle-to-far distance so they do not need to touch the lens constantly.
Some PVS-31-style devices may also offer brightness or gain control. This does not replace focusing. Gain changes the brightness of the image, while focus changes the sharpness of the image. If the image is bright but still blurry, check the diopter adjustment and objective focus first.
Basic Buttons and Controls
Before using any night vision goggles in the dark, learn the controls in a lit room with the device turned off. This helps prevent wrong operation later.
The most basic control is the power switch. Depending on the model, it may be a knob, button, or switch. It turns the device on and off. Some models may also include a standby mode or auto shutoff when the goggles are flipped up, but this depends on the configuration.
The IR illuminator is another common function. An IR illuminator emits infrared light that can help the device see in extremely dark conditions. To the naked eye, this light may not be visible, but other night vision devices may detect it. For general use, the IR illuminator should be used only when needed, especially in very dark indoor spaces or when there is not enough ambient light.
Manual gain control may be available on some models. Gain controls how bright the image appears. If the image is too bright and uncomfortable, reduce the gain. If the image is too dark, increase it gradually. Do not confuse gain with focus. A brighter image is not always a clearer image.
Many PVS-31-style binocular night vision goggles have articulating pods. This means each optical pod can be flipped up or moved outward. This is useful when the user wants to temporarily clear one eye or move the device away from the viewing position. Some models may turn off a pod when it is flipped up, but this is not universal.
A beginner should practice finding these controls by touch. In low-light conditions, you may not be able to see the buttons clearly. Practice slowly and avoid forcing any switch, knob, or pod movement.
How to Change the Battery
Battery replacement is simple, but it should be done carefully. Different PVS-31 night vision goggles may use different battery types or external battery packs, so always check the product manual or the label inside the battery compartment.
Before changing the battery, turn off the device. This protects the night vision device and reduces the chance of electrical contact issues. Then open the battery compartment slowly. Do not use excessive force, especially if the cap has a sealing ring.
Remove the old battery and check the battery direction. Most battery compartments show positive and negative polarity marks. Insert the new battery in the correct direction. If the battery is inserted incorrectly, the device may not power on.
After installing the battery, close the battery cap firmly but do not overtighten it. Turn on the device in a suitable low-light environment and check whether the image appears normally.
Good battery habits can reduce many beginner problems:
- Remove the battery if the device will not be used for a long time.
- Do not use leaking, damaged, or low-quality batteries.
- Carry spare batteries for outdoor use.
- Keep the battery compartment clean and dry.
- Do not mix different battery types unless the manual allows it.
If the device does not turn on after a battery change, check the battery direction, battery condition, and battery cap connection first. Do not immediately assume the device has failed.
How to Move and Observe
Using PVS-31 night vision goggles is different from natural daytime viewing. Even with binocular night vision goggles, your field of view is still more limited than normal human vision. This means you need to change the way you observe.
A common beginner mistake is trying to look around only by moving the eyes. With night vision goggles, this does not work well. The user should turn the head to scan the environment. Think of the goggles as a fixed viewing window in front of your eyes. To see left, right, up, or down, move your head instead of only moving your eyes.
When walking, move slowly. Scan the ground, then the area ahead, then both sides. Do not stare only at distant objects. Many small obstacles are close to your feet, such as stones, steps, branches, cables, or uneven ground.
A simple scanning pattern is:
- Look ahead to understand the direction.
- Lower your head slightly to check the ground.
- Turn your head left and right to check the sides.
- Look ahead again before moving forward.
This scanning habit helps compensate for the limited field of view. It also reduces the chance of missing obstacles at the edge of the image.
Depth perception may also feel different at first. Although binocular night vision goggles can feel more natural than a single monocular device, new users still need time to adapt. Practice in a safe open area before using the device in more complex environments.
Common Beginner Mistakes
Many beginner problems come from setup, not from the device itself. Understanding these mistakes can save time and prevent frustration.
One common mistake is adjusting only the objective focus and ignoring the diopter adjustment. If the eyepiece is not set for your eyesight, the image may never look fully clear. Set the diopter first, then adjust the objective focus for distance.
Another mistake is placing the goggles too far from the eyes. This can make the image look narrow or incomplete. Adjust the helmet mount until the eyepieces sit in a comfortable position.
Some users turn on the IR illuminator too often. IR light is useful in very dark conditions, but it is not always needed. If there is enough ambient light, the image intensifier tube can usually work without extra IR support.
A fourth mistake is walking too fast. Night vision gives you visibility in low light, but it does not make the environment the same as daytime. Move slowly until you understand how distance, obstacles, and edges appear through the device.
Beginners may also forget to turn off the device after use. This wastes battery power and may increase unnecessary operating time. Develop a habit: power off, protect the lenses, and store the device properly.
Another issue is touching the lenses with fingers. Fingerprints, dust, and oil can reduce image quality. Use proper lens cleaning tools and keep lens caps on when the device is not in use.
Safety Tips
A PVS-31 is an optical and electronic device, so it should be handled carefully. The most important rule is to avoid strong light exposure. Do not point the objective lenses directly at bright lights. Strong light may affect the image intensifier tube, especially if the device does not have strong protective features.
Use lens caps when storing or transporting the device. Lens caps help protect the glass from dust, scratches, and accidental light exposure. If the device includes daylight training caps or protective covers, use them according to the manual.
Check the helmet mount before every use. A loose mount can cause the goggles to shake or fall. Make sure all locking points are secure before moving.
Keep the device dry and clean. If it is used in humid, dusty, or cold environments, follow the manufacturer’s storage and cleaning instructions. Do not open sealed parts or attempt internal repairs unless you are qualified to do so.
For first-time users, choose a safe practice area. Avoid stairs, traffic, deep water, steep slopes, or cluttered ground during early practice. Learn the controls and viewing behavior before using the device in unfamiliar outdoor areas.
Also remember that a night vision device improves low-light visibility, but it does not remove all risk. Shadows, reflective surfaces, glass, fog, dust, and sudden light changes can still affect what you see.
Beginner Practice Routine
A short practice routine helps new users become comfortable with PVS-31 night vision goggles before real outdoor use. Start indoors or in a controlled low-light space.
For indoor practice, focus on basic handling. Put on the helmet or head harness, attach the device, and adjust the eye position. Turn the device on only in a suitable low-light environment. Practice finding the power switch, IR illuminator control, and focus rings by touch.
Then practice focusing. Choose a simple object at a safe distance and adjust the diopter and objective focus. Switch between a near object and a farther object to understand how the front lens affects clarity.
After that, move to a safe outdoor area. Start by standing still and scanning left to right. Then check the ground and nearby objects. Once you feel comfortable, walk slowly in a straight line while scanning ahead and downward.
A basic outdoor routine can include:
- Standing scan: left, center, right
- Ground scan: near ground and walking path
- Distance scan: near, middle, and far objects
- Slow walking: short distance with frequent stops
- Focus practice: adjust for near and far targets
Do not rush this process. New users often need several short sessions to feel natural with night vision goggles. Comfort and control are more important than speed.
Conclusion
Learning how to use PVS-31 night vision goggles starts with the basics. A beginner should first understand the structure of the device, then learn how to wear it correctly, adjust the diopter, set the objective focus, use the controls, and change the battery safely.
The most important habit during use is active scanning. Because the field of view is limited, you need to turn your head and observe the environment step by step. Move slowly, check the ground often, and practice in a safe area before using the device in more complex conditions.
PVS-31-style binocular night vision goggles are practical tools for low-light observation, but good performance depends on correct setup and careful handling. Once the basic operation becomes familiar, the device will feel more natural, comfortable, and reliable during use.
Meta Title:
How to Use PVS-31 Night Vision Goggles: Beginner Guide
Meta Description:
Learn how to wear, focus, operate, and maintain PVS-31 night vision goggles. A beginner-friendly guide for using binocular image intensifier night vision devices.
Suggested URL Slug:
how-to-use-pvs-31-night-vision-goggles
You might also enjoy
Night Vision Specs Matter—but Not in the Way You Think
At some point, buying night vision became less about seeing in the dark and more about winning an argument on the internet.
Night Vision Heart Care
A practical do’s and don’ts guide for protecting image intensifier tubes in PVS-14, dual-tube goggles, and custom NVG systems.
Cheap Chinese Night Vision— Hidden Gem or Overhyped?
For the past few years, the night vision community has been waiting for one thing:
When are we finally getting real night vision that does not cost an insane amount of money?
But reality has been pretty brutal. Analog night vision is still expensive, especially when you start talking about high-performance image intensifier tubes, decent glass, and a solid housing. Anyone who has spent time in the NVG world knows the big cost drivers: the housing, the optics, and the intensifier tube.
And once you move from a monocular to a binocular setup, the cost jumps fast. Two tubes, two optical channels, and a more complicated housing — that is where the money goes.
That is exactly why more overseas buyers are starting to pay attention to Chinese night vision devices. Not just because they are cheaper, but because some of them are starting to hit a much more realistic balance between price, weight, field of view, features, and actual analog night vision performance.